
How to Replace a Nail Down Prefinished Hardwood Floor Board
Do you have concerns about a damaged hardwood board? You are not alone.
Everyone who owns a hardwood floor will probably have to do a board replacement at some time. Board replacement is a normal part of the hardwood flooring industry, in fact up to 8 percent of your flooring can be replaced and your floor will still have its integrity.
Most boards need to be replaced due to events that are out of our control, for example: environmental factors, objects that fall, or damage from furniture, shoes, children, and pets. A board replacement will have your flooring looking like it was never damaged and you will never know that it has been done.
Here are the steps on how to replace a damaged board.
Tools needed for Board Replacement
- Circular Saw
- Chisel
- Hammer
- #2080 painters tape
- Epoxy
- Miter Box
- Small pry bar
- Painters plastic (use to cover furniture from exposure to dust)
***Installation Tip #1: Due to natural color changes in wood species, the new board may not match the shade of the old flooring. If this is the case, let the new board sit in the home for a week in a spot where it will receive the most light. Direct light will quicken the color change, allowing the new board to blend in better with the old flooring. This will also help the new board acclimate to the environment of the home.
***Installation Tip #2: Measure the width of the old board to see if it is equal to the width of the new board. If the old wood has expanded due to moisture, the new board may not fit and the board replacement should wait to be done during a drier climate.
Step 1 – Cover the bottom of you circular saw with blue tape so it will not scratch your flooring. Set the depth of the skill saw to the thickness of the board being replaced. Apply blue tape around the board that is being cut so you don’t mistakenly cut into another plank. Cut down the length of the board on the groove side and on the tongue side and then make another cut diagonally across the first two cuts.
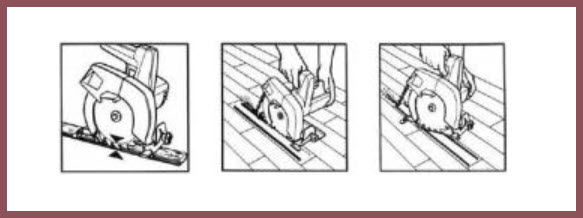
Step 1
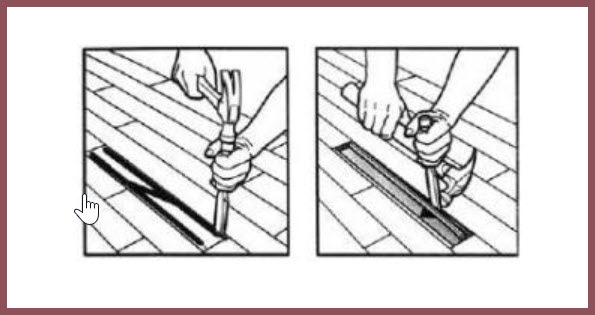
Step 2 – Take a hammer and pry bar and pull up the 2 halves in the middle of the board. Then chisel out the remaining pieces around the edges.
Step 3 – Pull out nails and cut out the felt or rosin paper. Take a vacuum and clean up any debris.
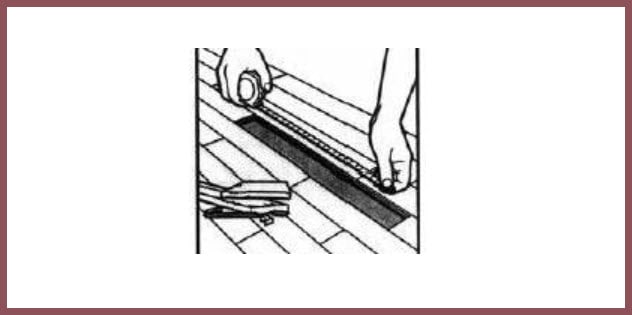
Step 4 – Measure the area that was cut out.
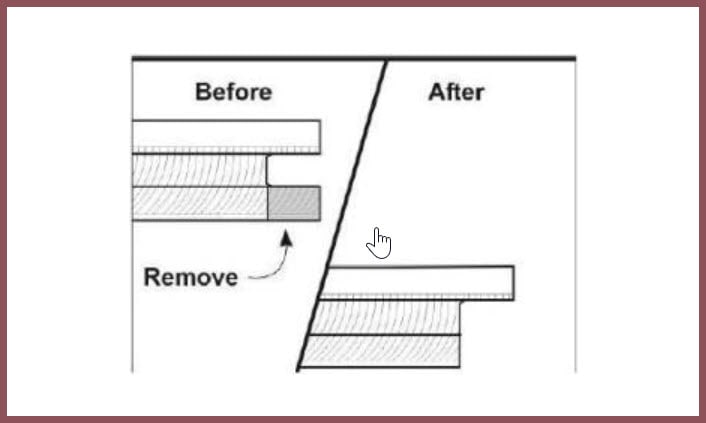
Step 5 – Measure new board and cut it to desired length needed. Use a sanding sponge to create a slight bevel on the cut edge.
Also cut the bottom groove off the length and width of the board.
This picture shows the groove cut off the width end, do the same for the bottom groove down the length of the board.
Step 6 – Apply a 100% urethane adhesive in a snake like pattern to the cleaned subfloor and place new board in sliding the tongue of the board into place first.
Take a block of wood and tap down gently on the new board to knock it in place.
Step 7 – Apply weight to the board until the adhesive has time to cure. You have now finished your board replacement.

If you ever have any questions about installation, you can also contact the LL Flooring Technical and Installation Department.
Visit www.llflooring.com. Start with an online chat if you need assistance.
Good luck with your project!
Follow LL Flooring on Instagram & Pinterest
ALSO, do you learn about home improvement and design with fun and informative videos? Subscribe to the LL Flooring YouTube Channel to learn more, leave comments or ideas that helped you, and join the community!
This video below is a quick look at a full replacement of a damaged engineered hardwood flooring plank, with the entire fix shown in under a minute. If only it were really that fast!
Related Articles